The information provided in this post is subject to the disclaimer.
Neuro AI system of agent networks (Neuro SAN) is an open-source, data-driven multi-agent orchestration framework designed to simplify and accelerate the development of collaborative AI systems. It allows users – from machine learning engineers to business domain experts – to quickly build sophisticated multi-agent applications without extensive coding, using declarative configuration files (in HOCON format).
Neuro SAN enables multiple large language model (LLM)-powered agents to collaboratively solve complex tasks, dynamically delegating subtasks through adaptive inter-agent communication protocols. This approach addresses the limitations inherent to single-agent systems, where no single model has all the expertise or context necessary for multifaceted problems.
I had the great pleasure of attending Cognizant’s Discovery EMEA event in July 2025. The speakers and sessions were first class and I really learned a lot. One demo that particularly impressed me was seeing the Neuro SAN Studio in action. The speed at which the solution is able to generate multi-agent networks is remarkable. It provides both an incredibly compelling demonstration on just what is possible with Agentic AI as well as generating real networks which can be refined, grounded with your own data, and eventually productionised.
I should say, I am not formally associated with Cognizant in any way. I was a guest at their event as my company has worked with them in the past. Your own use of Neuro SAN Studio is subject to the published license and entirely at your own risk.
Installing Neuro SAN Studio
I am running Neuro SAN Studio on an Azure IaaS Virtual Machine, running Windows (Windows Server 2025 Datacenter Azure Edition) on a Standard DS2 SKU. This process assumes you have the basics such as a running Windows OS with Internet access and local administrator rights.
Install Git
Open an elevated Terminal session and execute the following command:
winget install --id Git.Git -e --source winget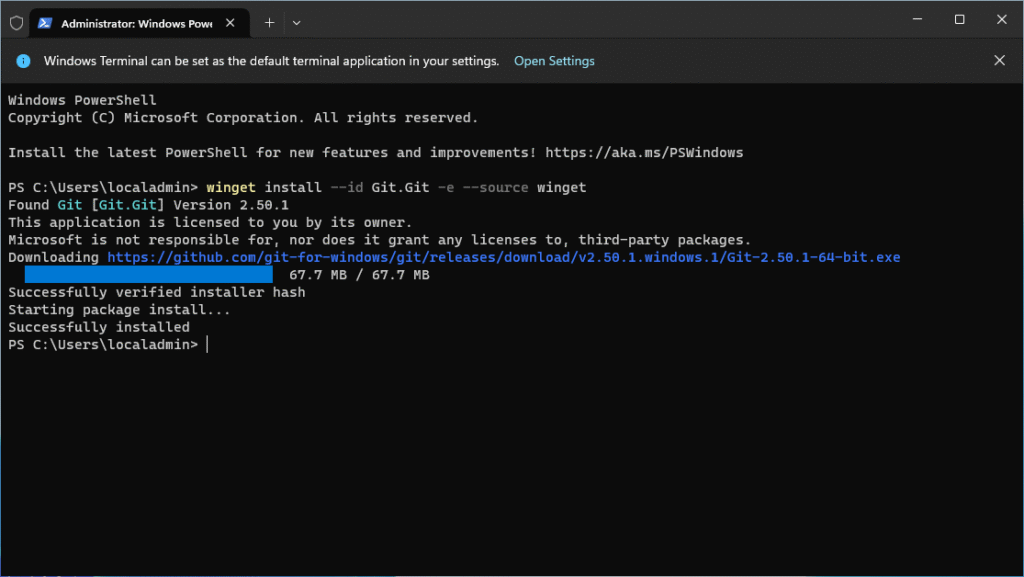
Install Python
At the time of writing, versions 3.12 and 3.12 are supported. Open an elevated Terminal session and execute the following command:
winget install --id=Python.Python.3.13 -e --accept-source-agreements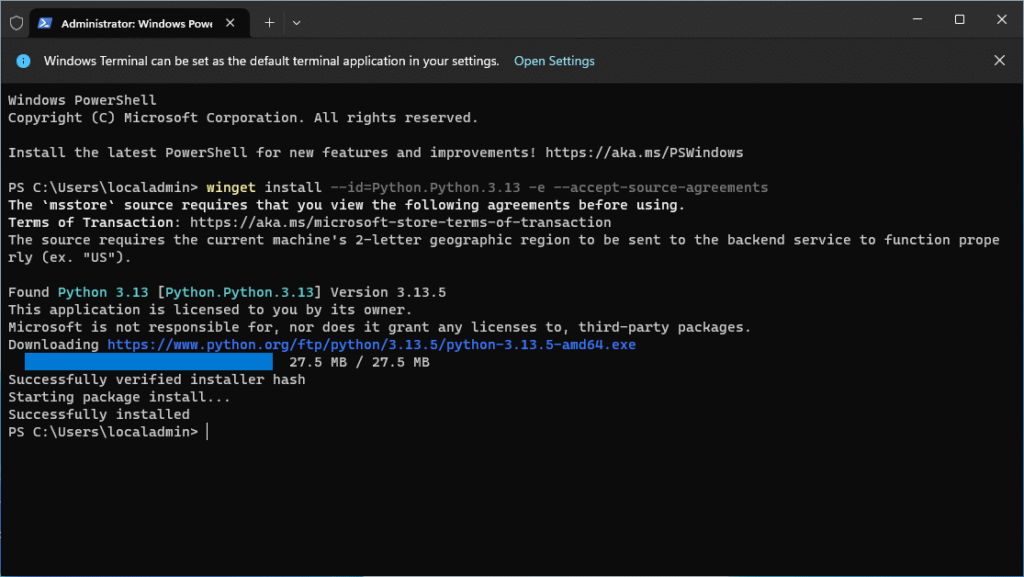
Clone the Neuro SAN Studio repo
Open an elevated Command Prompt and execute the following command:
cd \ && md neuro-san-studio && cd neuro-san-studio && git clone https://github.com/cognizant-ai-lab/neuro-san-studio.git .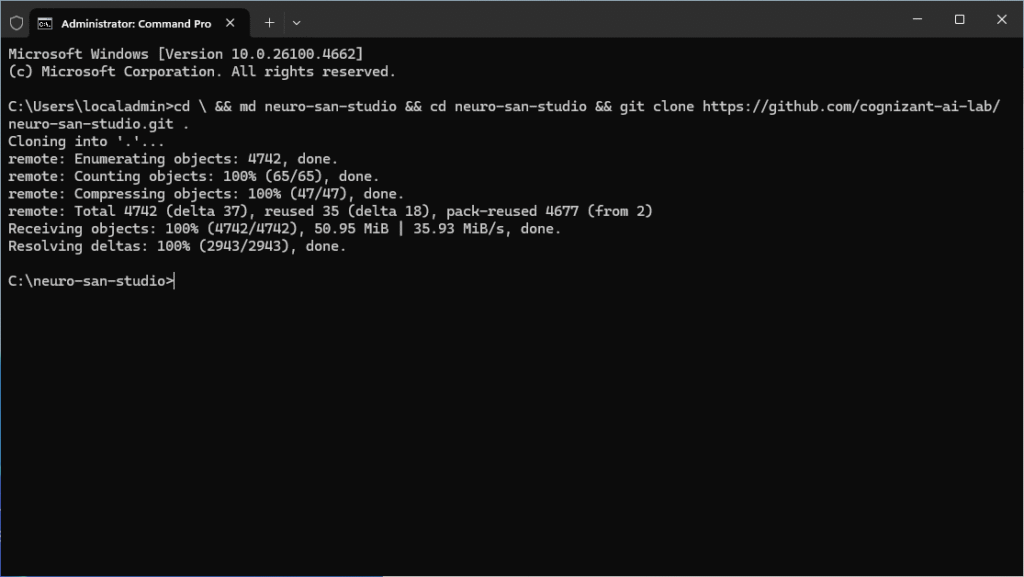
configuring neuro san studio
Configuring the Python environment
Open an elevated Command Prompt and execute the following commands:
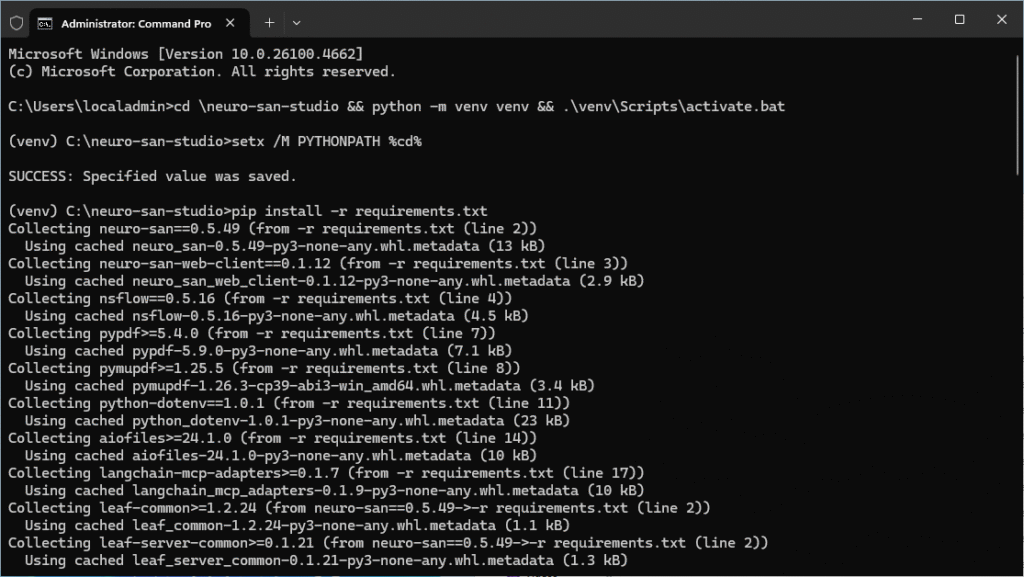
cd \neuro-san-studio && python -m venv venv && .\venv\Scripts\activate.bat
setx /M PYTHONPATH %cd%
pip install -r requirements.txt
Wait for the last command to complete. It can take several minutes.
Setting your API Key
By default, Neuro SAN Studio will use the OpenAI API. If you have an OpenAI API, obtain your API key and execute the following command in an elevated Command Prompt:
setx /M OPENAI_API_KEY <your api key>If you are using the Azure OpenAI API, the process is a little more involved and is documented here. You can also Anthropic and Gemini APIs with Neuro SAN Studio. Further details are available in the GitHub repo docs.
When using the Azure OpenAI API, execute the following commands in an elevated Command Prompt:
setx /M AZURE_OPENAI_API_KEY <your api key>
setx /M OPEN_API_VERSION <your api version>
setx /M AZURE_OPENAI_ENDPOINT <your api endpoint>
setx /M AZURE_OPENAI_DEPLOYMENT_NAME <your api deployment name>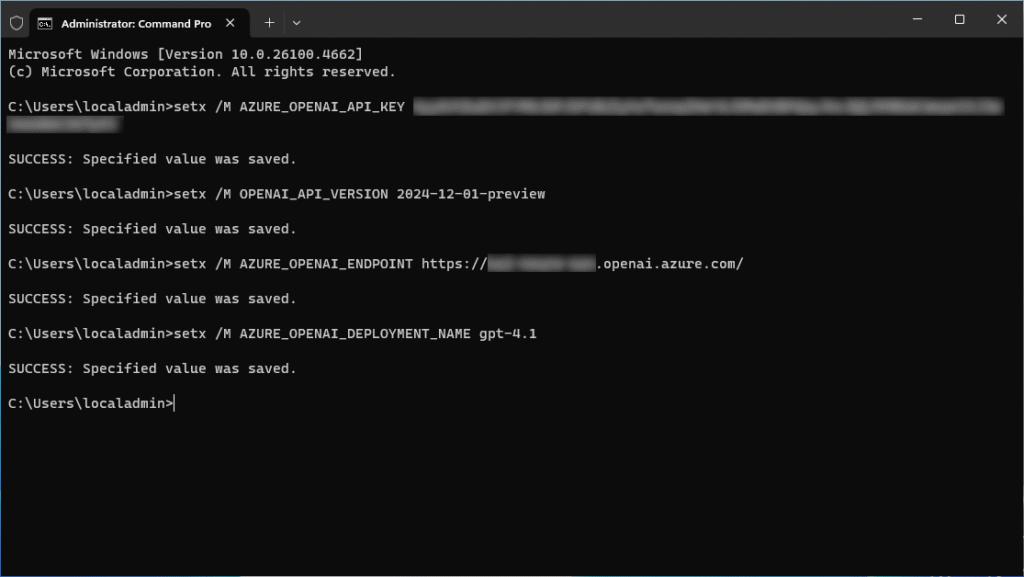
Configuring the example agent networks to use the Azure OpenAI API
Only complete this step if you want to use the Azure OpenAI API instead of the OpenAI API. Open an elevated Terminal session and execute the following code:
(you can copy/paste the full multiline code into Terminal)
Get-ChildItem -Path "C:\neuro-san-studio\registries" -Filter *.hocon -Recurse | ForEach-Object {
    $path = $_.FullName
    $content = Get-Content $path -Raw
    $newContent = $content -replace '"model_name":\s*"gpt-4o"', '"model_name": "azure-gpt-4"'
    $utf8NoBom = New-Object System.Text.UTF8Encoding $false
    [System.IO.File]::WriteAllText($path, $newContent, $utf8NoBom)
}
Configuring generated agent networks to use the Azure OpenAI API
Only complete this step if you want to use the Azure OpenAI API instead of the OpenAI API for any custom agent networks generated using agent_network_designer. Open an elevated Terminal session and execute the following code:
(you can copy/paste the full multiline code into Terminal)
$filePath = "C:\neuro-san-studio\coded_tools\agent_network_designer\get_agent_network_hocon.py"
$content = Get-Content $filePath -Raw
$newContent = $content -replace '"model_name":\s*"gpt-4o"', '"model_name": "azure-gpt-4"'
$utf8NoBom = New-Object System.Text.UTF8Encoding $false
[System.IO.File]::WriteAllText($filePath, $newContent, $utf8NoBom)
Configuring Windows Firewall
Open an elevated Terminal session and execute the following code:
New-NetFirewallRule -DisplayName "Allow NeuroSan TCP 30011" -Direction Inbound -Protocol TCP -LocalPort 30011 -Action Allow -Profile AnyRunning Neuro SAN Studio
Open an elevated Command Prompt and execute the following command:
cd \neuro-san-studio && .\venv\Scripts\activate.bat && python -m run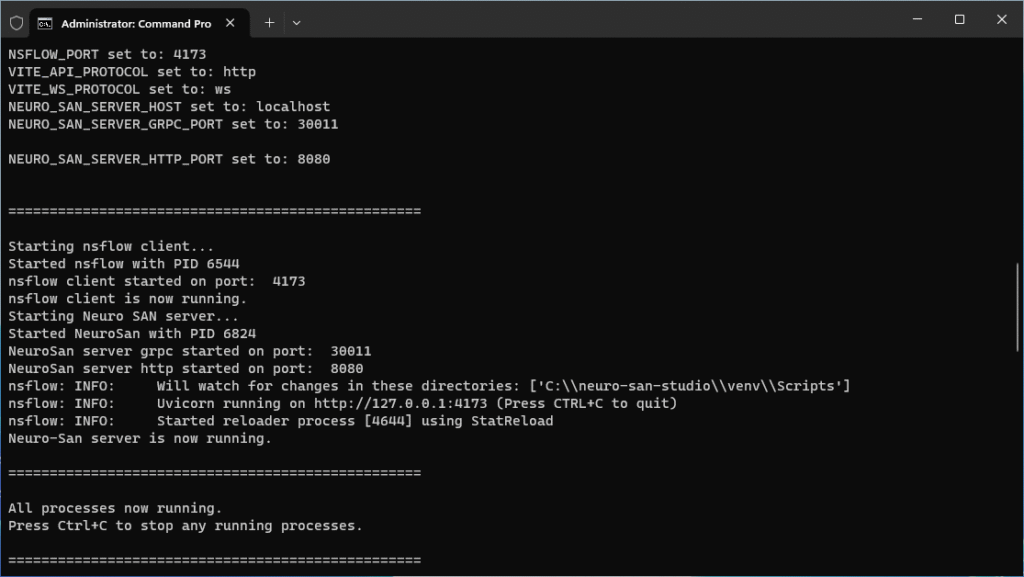
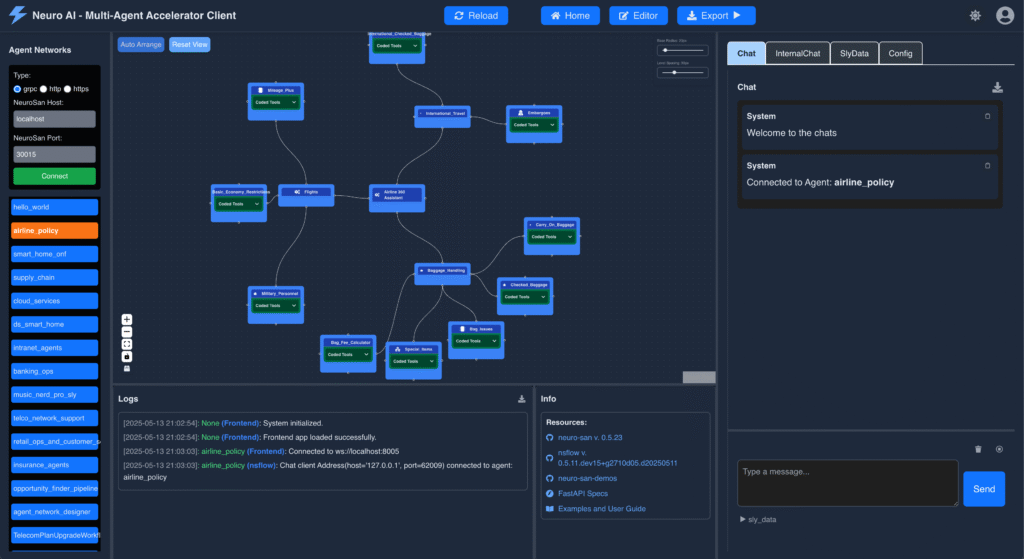
Using Neuro SAN Studio
Browse to http://127.0.0.1:4173 on the computer running Neuro SAN Studio
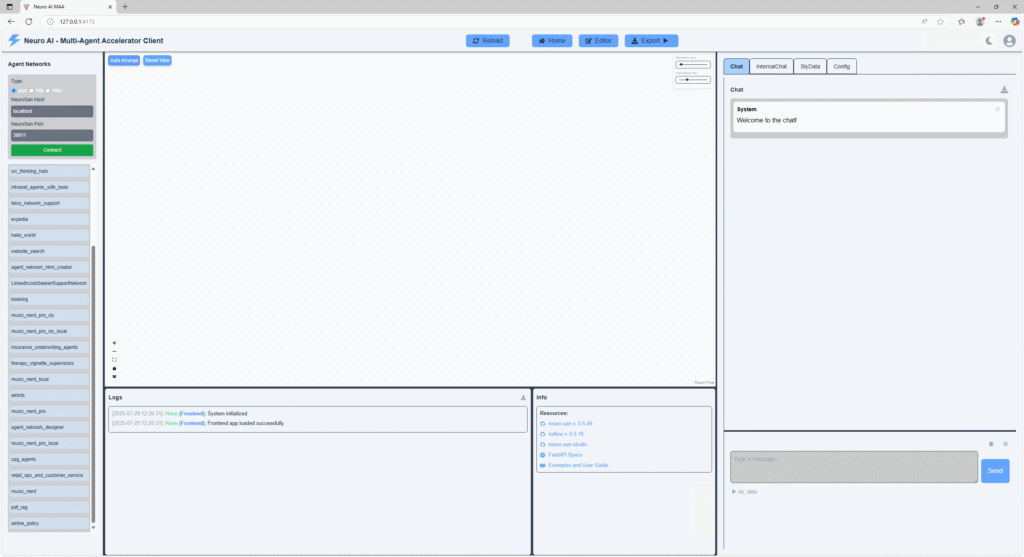
Congratulations! You’re now ready to start using Neuro SAN Studio. Resources to get started are linked to in the Info section.
Top tip: You can use the agent_network_designer agent to generate entirely new agent networks!
Updating to the latest version
Stop any running session. Open an elevated Command Prompt and execute the following commands:
cd \neuro-san-studio && git fetch --all && git reset --hard origin/mainAfter updating, re-execute the code in the Configuring the example agent networks to use the Azure OpenAI API and Configuring generated agent networks to use the Azure OpenAI API steps if you need use the Azure OpenAI API instead of the OpenAI API.
CAUTION
This command will not delete any agent networks that you create using agent_network_designer, the HOCON files will remain in the C:\neuro-san-studio\registries folder, however it will reset manifest.hocon in the registries folder. To re-add any non-standard agent networks, you will need to manually update manifest.hocon.
For example, to re-add an agent network that is specified in the file mycustomnetwork.hocon, add “mycustomnetwork.hocon”: true to the end of manifest.hocon before the closing }. If you are re-adding multiple non-standard agent networks, ensure entires are separated with a comma.